

How to Move an Image Inside a Mask in After Effects: The Complete Masterclass
You draw a clean vector mask around a subject or frame in Adobe After Effects. You click and drag your image across the composition viewer to reposition it, but the mask moves right along with the image.
This frustration happens to almost every video editor and motion designer. By default, After Effects locks vector masks to the layer’s local coordinate system. When you transform the layer’s position, you move both the media pixels and the mask boundaries simultaneously.
Fortunately, moving an image inside a mask without shifting the mask frame is easy once you master the correct workflows. This comprehensive tutorial covers five proven methods to move, re-frame, and animate images inside masks in After Effects. Whether you need a quick hotkey trick or a flexible production rig, these techniques will streamline your motion graphics workflow.
1. Understanding After Effects Mask Architecture vs. Layer Transforms
Before jumping into the solutions, you must understand how Adobe After Effects processes layer transforms and mask coordinates.
When you create a vector mask directly on a footage layer, solid, or image, After Effects nests that mask path inside the layer’s transform properties. The mask geometry relies on the layer’s local X and Y axes.
Layer Hierarchy Breakdown
- Image Layer: Controls Position, Scale, Rotation, and Opacity across the main composition canvas.
- Mask Path: Positioned directly inside the Image Layer space, inheriting all parent transform movements.
When you grab the Selection tool (press V) and move your image across the Composition window, you alter the Layer Position property. Because the mask exists inside the layer space, it moves identical distances across the canvas.
To move the image independently of the mask, you must break or bypass this link. You can accomplish this through five primary methods:
- Shifting the layer’s anchor point using the Pan Behind Tool.
- Separating the container and content using a Track Matte.
- Applying the Transform Effect directly to the layer.
- Repositioning the Mask Path vertices directly.
- Rigging independent elements with a Null Object.
2. Method 1: Using the Pan Behind (Anchor Point) Tool
The Pan Behind tool provides the fastest way to re-frame a static image inside an existing mask without adding extra layers or effects.
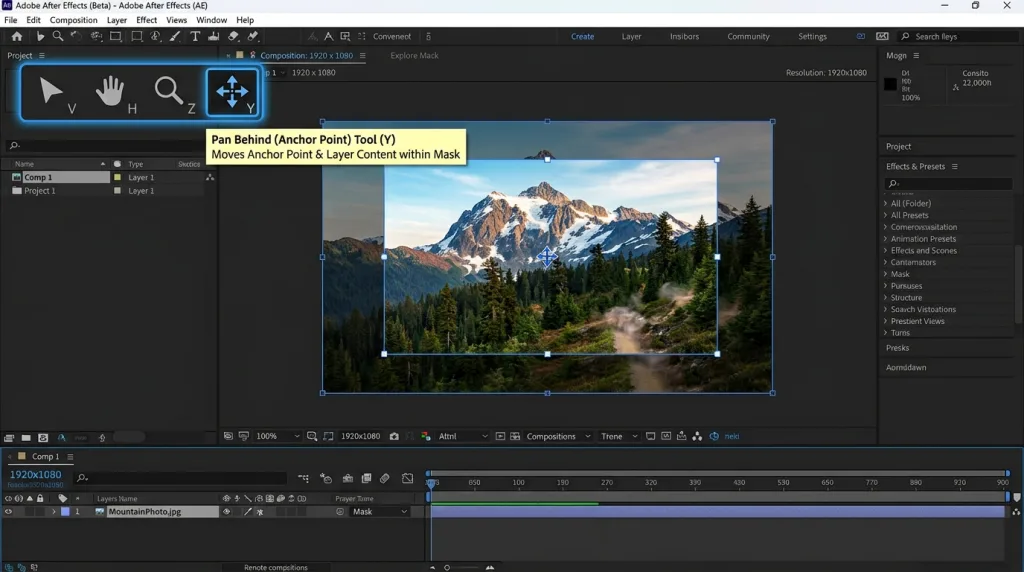
Step-by-Step Instructions
- Select Your Layer: Click the masked image layer in your Timeline panel.
- Activate the Pan Behind Tool: Press Y on your keyboard (or select the Pan Behind / Anchor Point icon in the top toolbar).
- Reposition the Image: Click directly inside your mask frame in the Composition window and drag.
- Observe the Result: The underlying image slides smoothly across the canvas while the mask perimeter stays completely fixed in place.
- Reset Your Tool: Press V to return to the standard Selection Tool once you finish re-framing.
How This Method Works
When you drag an image using the Pan Behind tool, After Effects adjusts two spatial properties at the same time:
- It changes the layer’s Anchor Point property.
- It compensates by adjusting the layer’s Position property in the opposite direction.
Because these two values offset each other perfectly, the layer’s mask retains its exact screen coordinates while the image texture slides underneath.
Important Note: The Pan Behind tool alters your layer’s anchor point position. If you plan to rotate or scale the image later, the rotation origin will shift to the new anchor point position.
3. Method 2: The Track Matte Workflow
While the Pan Behind tool works great for quick static adjustments, professional motion graphics production relies heavily on Track Mattes. Using a dedicated Track Matte separates your mask geometry from your media layer completely.
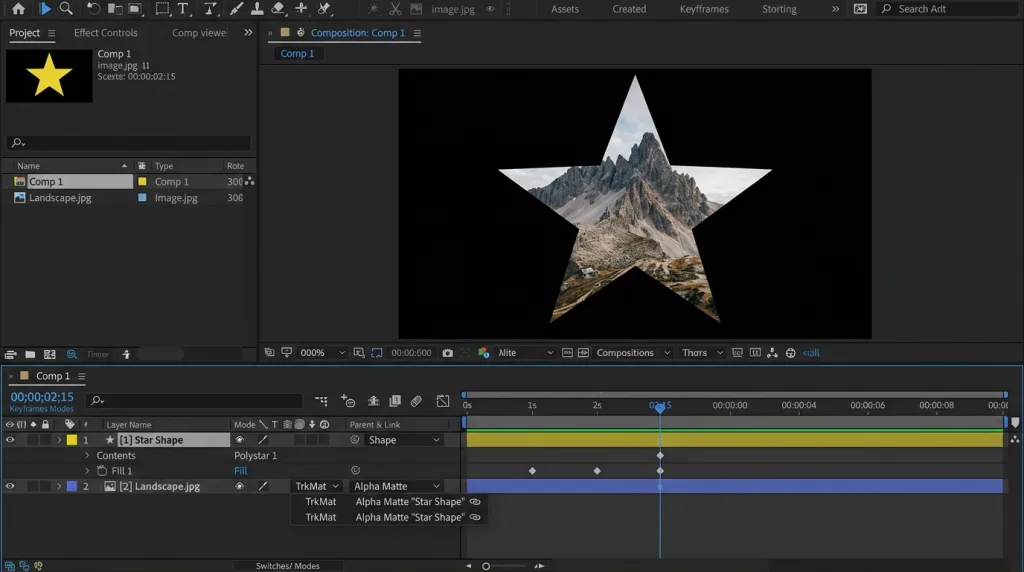
Step-by-Step Instructions
Step 1: Create Your Matte Shape
Select the Shape Tool (press Q) or Pen Tool (press G). Ensure no layers are selected in your timeline, then draw your desired mask boundary directly on the canvas. After Effects creates a new Shape Layer above your timeline stack.
Step 2: Position the Matte Layer
Place the Shape Layer directly above your image layer in the timeline ordering stack. Rename the shape layer to something descriptive, such as Frame Matte.
Step 3: Link the Track Matte
Locate the Track Matte column in your Timeline panel. If you do not see this column, press F4 or click the Toggle Switches / Modes button at the bottom of the timeline.
Click the Pick Whip icon in the Track Matte column next to your image layer, then drag it up to target your Frame Matte shape layer.
Timeline Configuration
- Layer 01: Frame Matte (Acts as the fixed frame boundary)
- Layer 02: My_Image.png (Set Track Matte to target Frame Matte)
Step 4: Move the Image Freely
Select your image layer and press V for the Selection Tool. Click and move the image anywhere on the canvas. The image moves freely while the shape layer above stays perfectly static, acting as a non-destructive window frame.
4. Method 3: Using the Transform Effect
Applying the native Transform Effect directly to your image layer allows you to animate image movement inside a mask without altering the layer’s master transform properties or anchor point.
Step-by-Step Instructions
- Select the Masked Layer: Click your masked image layer in the timeline.
- Open Effects & Presets: Press Ctrl + 5 (Windows) or Cmd + 5 (Mac) to open the Effects & Presets panel.
- Apply Transform: Type Transform into the search bar. Drag and drop the Transform effect (located under Distort) onto your image layer.
- Adjust Effect Controls: Open the Effect Controls panel by pressing F3.
- Animate or Shift Position: Locate the Position parameter inside the Transform effect settings. Click and drag the X or Y coordinates.
Because After Effects calculates render order from top to bottom, vector masks process after layer effects in standard stack orders. Shifting the position inside the Transform effect moves the image data before the mask crops the layer visually.
5. Method 4: Manipulating and Keyframing the Mask Path Directly
If you prefer using standard vector masks built into a single layer, you can move the image by moving the layer position, and then shifting the mask path back to its original location. Alternatively, you can select all mask vertices to reposition the mask manually.
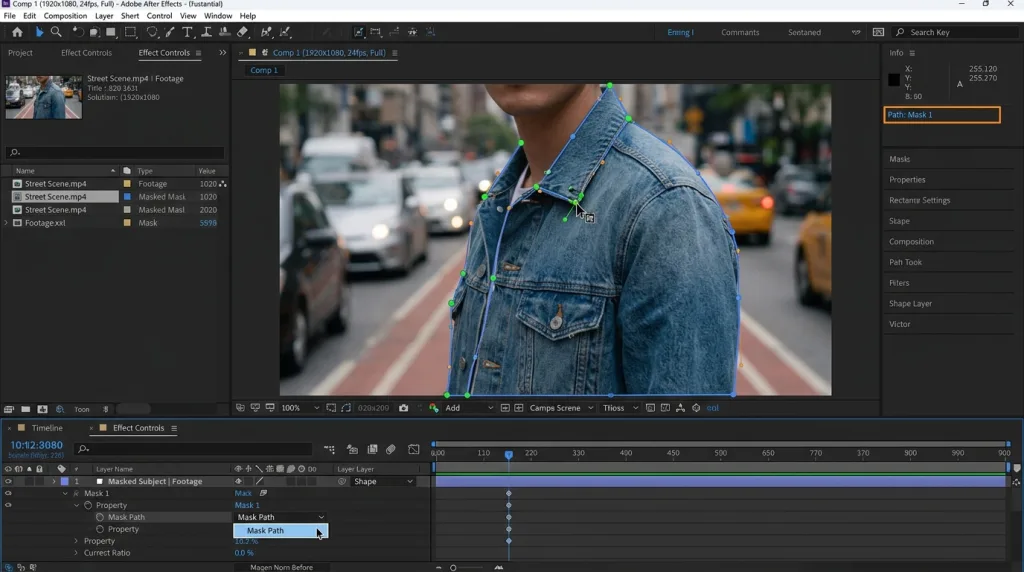
How to Select and Shift All Mask Points
- Select your masked layer in the timeline and press M to reveal the Mask Path property.
- Click the word Mask Path in the timeline list. This action highlights every vertex point along the mask perimeter in the Composition viewer.
- Double-click any of the mask’s vector points or bounding edges in the Composition window. A free-transform bounding box will appear around the mask path.
- Drag the mask path to any location on the canvas.
If you find your mask vertices deforming unexpectedly during movement, you can explore how designers solve vertex locking issues by reviewing community discussions on moving images inside masks.
6. Method 5: Null Object Rigging for Complex Animations
When building complex motion graphics, lower thirds, or multi-photo slideshows, you often need to move the frame mask and the internal image independently using keyframe animation. Setting up a Null Object control hierarchy offers maximum flexibility.
Rigging Procedure
- Create a Null Layer: Select Layer > New > Null Object from the top menu (or press Ctrl + Alt + Shift + Y / Cmd + Option + Shift + Y). Name it Control_Null.
- Set Up a Track Matte: Create a Shape Layer frame and link your image to it using a Track Matte (as outlined in Method 2).
- Parent the Elements:
- Parent the Shape Layer Frame to the Control_Null.
- Leave the Image Layer unparented, or parent it to a separate control null.
Parent-Child Control Structure
- Control_Null: Master controller that drives overall frame positioning.
- Shape Layer Frame: Follows the master control null as a track matte.
- Image Layer: Operates independently inside the frame bounds.
Motion Options Unlocked by This Rig
- Pan the Entire Graphic: Move or scale Control_Null. Both the mask frame and the image shift across the screen together.
- Pan Only the Image: Move the Image Layer position. The image slides smoothly while the mask frame remains locked in space.
- Pan Only the Frame: Move the Shape Layer position. The window frame reveals different areas of the stationary image behind it.
7. Advanced Masking Techniques: Soft Edges and Inversion
Moving an image inside a mask becomes even more effective when combined with advanced edge controls. After Effects offers multiple mask parameters that refine how images blend into composition backgrounds.
Feathering and Mask Expansion
When you slide an image underneath a mask, crisp vector edges can appear harsh. You can adjust edge blending using two built-in properties:
- Mask Feather (Press F): Softens the perimeter edges of your mask in pixels. Increasing feathering creates a smooth gradient transition between the image and background elements.
- Mask Expansion: Expands or contracts the boundary of the mask path without altering vertex point locations.
| Setting | Edge Result | Typical Application |
|---|---|---|
| Mask Feather: 0px | Sharp, hard crop boundary | Graphic UI frames, split screens, geometric masks |
| Mask Feather: 25px–50px | Soft, smooth gradient fade | Organic composite blending, light leaks, subtle overlays |
| Mask Expansion: Negative | Contracts mask inward | Cleaning up fringe artifacts along cutout edges |
Inverted Masks vs. Alpha Mattes
If you need to cut a hole in an image layer rather than fitting an image inside a frame, toggle the Inverted checkbox next to the Mask Path setting in your timeline.
When working with alpha channels or complex video masks, check out video guides such as these visual After Effects masking walkthroughs to see real-time layer setups in action.
8. Troubleshooting Common After Effects Masking Issues
Even experienced editors run into technical snags when manipulating masks and layer paths. Here is how to diagnose and solve the most common issues:
Issue 1: Mask Distorts or Changes Shape When Dragged
- Cause: You selected a single vertex point instead of selecting the entire mask path array.
- Solution: Click the layer, press M, and click the label Mask Path in the timeline to select all points simultaneously. Alternatively, double-click the mask path in the composition viewer to reveal the bounding transform box.
Issue 2: Mask Lines and Handles Are Invisible in the Composition View
- Cause: Layer controls or mask visibility toggles are turned off in your viewer settings.
- Solution: Press Ctrl + Shift + H (Windows) or Cmd + Shift + H (Mac) to toggle layer controls visible. Also, click the Toggle Mask and Shape Path Visibility icon located at the bottom-left of the Composition panel.
Issue 3: The Image Disappears Entirely When Track Matte Is Enabled
- Cause: The matte layer lacks fill opacity or exists on an empty alpha area.
- Solution: Ensure your shape layer or solid layer has a visible Fill color enabled (the specific color does not matter, as long as fill opacity sits at 100%).
9. Method Comparison Matrix & Shortcuts
Use this fast comparison matrix to choose the ideal technique for your specific project scenario:
| Method | Primary Shortcut / Tool | Best Use Case | Preserves Original Anchor Point? |
|---|---|---|---|
| Pan Behind Tool | Y key | Quick static re-framing of images inside masks | No (Shifts Anchor Point) |
| Track Matte | F4 (Toggle Modes) | Complex motion graphics, lower thirds & frame rigs | Yes |
| Transform Effect | Ctrl + 5 (Effects) | Keyframing movement inside a mask non-destructively | Yes |
| Mask Path Selection | Double-click Mask | Manual geometric adjustments on single layers | Yes |
| Null Rigging | Ctrl + Alt + Shift + Y | Parallax effects and multi-layer compositions | Yes |
Frequently Asked Questions (FAQs)
How do I lock a mask position while moving the layer in After Effects?
The easiest way to keep a mask position fixed while moving the underlying layer is by using a Track Matte. Create a shape layer above your image to serve as the fixed mask frame, then link your image layer to it using the Track Matte pick whip. You can now move the image layer anywhere on the canvas while the mask frame remains locked.
What is the shortcut key to move an image inside a mask?
The shortcut key is Y, which activates the Pan Behind (Anchor Point) Tool. Once selected, click and drag your image inside the composition window. The image slides underneath while the mask boundary stays stationary. Press V to return to the standard Selection tool when finished.
Why does my mask move when I try to move my layer?
In After Effects, vector masks attach directly to the layer coordinate space. When you select a layer and change its Position property, After Effects moves both the layer media and all attached mask paths together. To move them separately, use the Pan Behind tool (Y), a Track Matte, or the Transform effect.
Can I use the Transform effect to move an image inside a mask?
Yes. Applying the Transform effect (located under Effects > Distort > Transform) allows you to adjust the Position parameter inside the Effect Controls panel. Because After Effects calculates effects before mask cropping in its render pipeline, shifting the effect position moves the image data inside the fixed mask boundary.
What is the difference between a Vector Mask and a Track Matte in AE?
A Vector Mask is drawn directly onto a single layer and shares that layer’s transformation coordinates. A Track Matte uses a completely separate layer (such as a Shape Layer or Solid) to define alpha or luminosity transparency for layers beneath it, allowing independent movement of both the frame and content.
How do I move multiple images inside a single mask simultaneously?
To control multiple images within one mask, place all your image layers inside a Pre-composition (Ctrl + Shift + C / Cmd + Shift + C). Apply your mask or Track Matte to the pre-comp layer itself. You can now open the pre-comp to move, arrange, or animate your internal images freely inside the master mask frame.
How do I animate an image sliding inside a frame without moving the border?
To animate an image sliding inside a frame, use either a Track Matte or the Transform Effect. Set keyframes on the Position property of your image layer (when using Track Mattes) or on the Position property inside the Transform effect controls. The image will animate smoothly while the frame border remains still.
Why are my mask expansion and feather controls affecting the whole layer?
If feathering or expansion appears across the entire composition, check whether your mask mode is set to Add, Subtract, or Intersect. If a mask path is open (unclosed vector endpoints), After Effects cannot calculate bounded interior fill areas correctly. Ensure your mask path forms a fully closed shape.
Conclusion: Master Your After Effects Masking Workflows
Repositioning an image inside a mask in Adobe After Effects is a foundational skill for video editing and motion design. Whether you use the quick Pan Behind tool (Y) shortcut for instant framing or set up flexible Track Mattes for complex animation rigs, separating your media content from your mask boundaries gives you complete creative control over your compositions.
Try experimenting with these five methods on your next project to discover which technique fits your motion graphics workflow best.
Keep reading
All articles
Your Complete Guide to Ecommerce Web Development Success
The Complete Blueprint for Ecommerce Web Development Building a digital storefront requires far more than just uploading a few product photos and…
Read article
What Is GEO? Complete Guide for 2026
Discover what GEO really means and how it helps your content appear inside AI answers. Learn practical tips, strategies, and real examples…
Read article
The Ultimate Keyword Research Learning Resource
Digital growth relies on one foundational pillar: understanding exactly how your audience communicates. Every time a user types a query into a…
Read article